Friday, December 17, 2010

Teacher Gifts

Hello everyone. I know I've been absent from my blog lately but I've been keeping busy running errands and preparing for the upcoming holidays. I did get a chance to make teacher gifts this year so I'm posting pictures of how they turned out. The teachers were really happy with them! I decorated a paint can with moonstruck and sky cardstock and used Ice Crystals and All Decked Out stamp sets. I got the directions for the Tresa Black's Fabulously Artsy Blog and the idea for decorating the front from Vicki Wizniuk's Blog. I saw the snowflake and ordered the stamp set in my next order because I fell in love. I filled the cans with chocolate covered popcorn...sinfully delicious!

Saturday, December 4, 2010

Sketch Time Once Again!


I'm finally back to my challenges again! It's been a busy few weeks but I think I'm back to my creating again. This week at Heart 2 Heart it's a sketch challenge. These are some of my favorite challenges. Here's the sketch to follow this time.

I went with a New Year's theme card this year. I was looking for something different. I wanted some sparkle and shine for the card so I dug out my embossing powder, sparkles and liquid glass. I first stamped the champagne glasses in Barn Red and then stamped over them with VersaMark ink and embossed with clear embossing powder. It adds a shine to the glasses. I embossed the snowflakes the same way. I added liquid glass dots to the back ground paper over the existing dots and to finish it off I added some sparkles to each glass.


Supplies:
Felicity Paper (September 2009 Constant Campaign)
Barn Red cardstock
Barn Red Ink
Twlight Ink
Crystal Blue Ink
Chocolate organdy ribbon
In The Month of January Stamp Set
Sparkles
Liquid Glass
Clear Detailed Embossing Powder

Monday, November 29, 2010

Christmas Layout

Hi Everyone! Sorry it's been a couple of weeks since I've posted or participated in a challenge. We were on vacation and trying to get ready and then recover. We're back, had a great time and have jumped back to normal life again.

Today I'm posting a Christmas Layout I made with my techniques class this past weekend. I used the clear cards to make the layout interactive and give me extra room for journaling and pictures! Thanks to my friend Sue I cut the cards in half and used a paper "binding" to attach it to my layout. What a great way to stretch the use of the clear cards! Thanks Sue!!

On the clear card you can add a picture to the front and a picture and then on the mat or you could use journaling in one of the spots. For one space you get 3 pictures, very cool. I've added a clear card on both the right and the left pages. I can't wait to fill the pages with Christmas pictures from this year. Hey, I'm ahead of the game, yeah!


Supplies: (all CTMH unless specified otherwise)
Creative Basics Mistletoe Collection - paper and gold ribbon
New England Ivy Cardstock
Cocoa Cardstock
Square clear card
Stocking Style stamp set
Evergreen stamp set
Cocoa ribbon round

Friday, November 12, 2010

Out of Shape

A great Challenge at Heart 2 Heart this week to keep me creative! Gettin' Out of Shape is the name of the game. Make a card that is NOT rectangle or square. I've put together a yummy birthday ice cream cone card. It's filled with lots of sparkle "sprinkles" and glittery icing.


All Supplies CTMH:
Stamp Sets: Party Pedant, Bolw of Cherries
Paper: Twitterpatted, It's a Guy Thing, Brown Bag
Embellishments: Colonial White Ricrac, Red and Pink Sparkles, Prisma Glitter

Sunday, October 31, 2010

Happy November - Stamp of the Month Blog Hop!


Wow it's November already! I am in shock that there is less than two months until Christmas. Along with the start of November comes a new Stamp of the Month! I love being able to earn stamp sets for reduced prices or even free! If you've arrived here from Jody Gustafson's Blog you're on the right track. If not you can keep going from here because the hop if one long circle.

This months stamp set is called "A Little Thanks". It's a perfect set to add some heartfelt words of thanks on a card or even to a scrapbook layout. I find that I send a large number of Thank You cards each year and this set is a fabulous to help me out with those cards.

I am trying hard to use up scraps and dig into my stash so I can make room for new paper that I "must have". I am so really having fun with the workshop guides that come in the Workshops for each of the new paper packs each new catalog. These kits are a fabulous deal and come with an exclusive stamp set only sold in this workshop, a full embellishment pack of some sort, a level 2 paper pack and a workshop guide. The workshop guide has one how-to exclusive layout and one exclusive card design. I save all of my workshop guide so I can use them with whatever paper I desire. For this month's blog hop I dug through my guides and found one that came with the Grace paper pack I thought would be perfect. I have some Grace scraps left so I went with that paper pack. What I love about the card design is that it's one design that they rotate 90 and 180 degrees to get three different cards! Lots of fun, super easy and all unique!

Now hop over to Traci Godbee's Blog to see what great artwork she's put together this month!

Wednesday, October 27, 2010

Gettin' Spooky Challenge

The challenge this week at Heart 2 Heart is to create something Halloween inspired. I made a Halloween card last week so I wanted to make something different this week. I decided to have a go at making some hexagon stacking boxes. I found a template online at Evil Mad Scientist and printed it at 90%, 100% and 110% to get the three different sizes.

I made them three different colors and put different decorations on each box. I also used a different technique on each box. The bottom box has 6 different jack-o-lanterns which I "rock and rolled". To do this ink the entire stamp in the lightest color. Before stamping it on the paper "roll" the edges of the stamp in a darker color and then gently huff on the stamp to remoisten and stamp on the paper. Depending on what colors you use it dramatically changes the look. I was going for very subtle so I used Goldrush and Autumn Terracota.

On the middle box I used a technique that I have been wanting to try but haven't done before. I embossed with glitter. This is a great way to get that glitter to really "stick" on your project. Mix 2 parts embossing powder to 1 part glitter. Ink and stamp an image with Versa Mark and sprinkle with the glitter embossing powder. This is so much fun! It's hard to see in the picture but the bats, and cauldrons really sparkle and appear to have lots of color even though they are black. The glitter really add lots of fun sparkle.

On the top box I colored the fun monster from Party Animal with a blending pen and ink pads. This is a great way to mix colors and add highlighting.

I will fill the box with some halloween treats for my son. I thought he would enjoy a special box just for him :)


Tuesday, October 26, 2010

Inspiring Art Work

I wanted to let everyone know that I've added several more of the great blogs that I follow in my Blogs I Love section. These are some super artists and wonderful writers. When you need some inspiration check out their blogs! Everyone loves it when you leave them comments too so if you have a few minutes let them know how much you like their art work.

I'm working on a piece of Halloween artwork that I'm hoping to post either tomorrow or Thursday so be sure to check back to see that. I am going to try out a new technique on 3D items for display in the house. I'm excited and have been gearing up for this for a couple of days now....now I just need to find a few minutes to get it started and then finished!

Wednesday, October 20, 2010

Embossing Challenge

This week's challenge is to use embossing on a project. It can be dry embossing or heat embossing. I happen to love embossing so this challenge is right up my alley. I couldn't decide on dry or heat embossing so I figured I just do both :)

I made a halloween card I'm sending to my nieces. I used the "In the Month of October" stamp set, which I love. The month ones are so versital and I find I keep grabbing for them!

I dry embossed on the card background and green accent piece. To do this you place the piece you want embossed on your cutter and using an embossing stylus run it down the cutting groove. Continue moving the paper and embossing until you get the desired patterned. To get even spacing I line up the first embossed line up with a line on my cutter and keep that same dimension all the way across. Once I was done embossing I turned it over and lightly sanded. This reveled the white core of the cardstock on the raised areas.

I heat embossed using versa mark and black embossing powder. I embossed the ghostly greeting circle, black cat, broom, bat and the fence with pumpkins. The heat embossing adds a shiny texture to the paper and mkes the item stand out.

It takes a little extra time but the embossing adds a ton and is so much fun! Try experimenting on your own layouts and cards!

Sunday, October 10, 2010

Birthday Bash!

This week was a really fun challenge to make a birthday card at Heart 2 Heart. Who doesn't need more birthday cards?? It's taken me all week to get to making the card but with 1 hour and 40 minutes to spare I made it!

I decided to go with a 5x7 card out of Wishes. I wanted to make a super bright card and do some sewing. I added glitter glue on the outside circles and a Happy Birthday message on the pull out tag.


All supplies CTMH unless noted otherwise.
Cardstock: Smoothie, Cotton Candy, Chocolate
B&T: Hooligans Level 2 paper pack
Stamp Sets: Happy Birthday, Festivities
Inks: Chocolate, Sunset, Pear, Lagoon
Embellishments: Clear buttons, Glitz glitter glue, craft thread (not CTMH)

Thursday, September 30, 2010

October Stamp of the Month Blog Hop


It's October already which means it's time for another blog hop! This month it's time to think Christmas. I know it might seem early but if you start thinking Christmas cards and gift tags now you'll be ahead of the holiday rush!

The Stamp of the Month is "Share the Magic". It's a great fun holiday stamp set.

If you're coming from Beth's Blog you're on the right track. If not you can continue from here as the hop makes a complete circle.

For the hop this month I decided to make a series of interactive gift tags. Each of the tags has the "To" and "From" hidden under a portion of the tag. I used brads, folded paper, and hinges. I chose the new Summer Carnival color pallet for a twist on the traditional Christmas colors.


Now hop over to Jen's Blog to see what great art she's created!

ABC Challenge

This week I'm able to play along at Heart 2 Heart again, yeah! The challenge is ABC:

A = Use alphabets either stamped or with My Stickease
B = Make something for a Boy
C = Use Chocolate or Cocoa

I was really excited because I love alphabet stamps, I have a boy and I love using cocoa as a neutral.

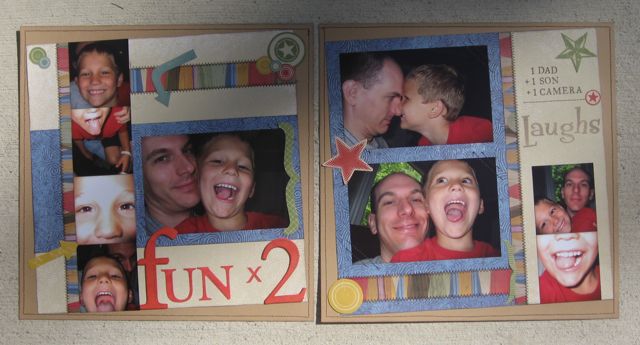
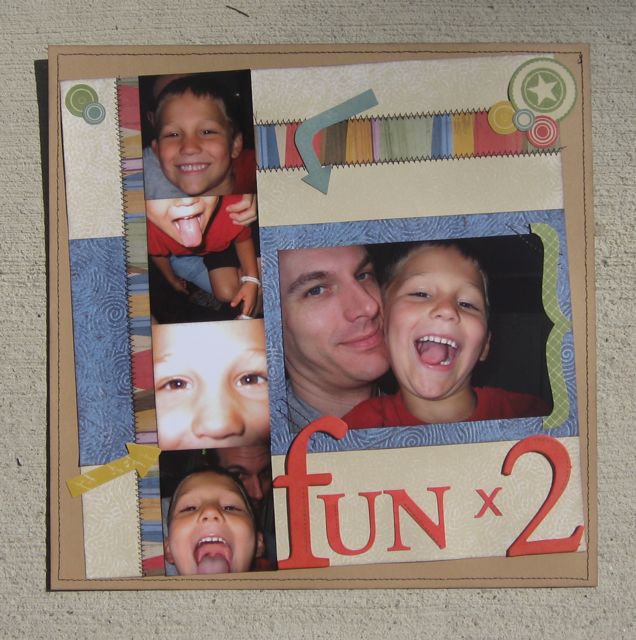
I wanted to making something for my son but didn't want to make a card. I decided to make a dry erase practice pad. To make the project dry erase I simply slid it into a memory protector. I turned the protector sideways so I could tie a marker to it so the two wouldn't become separated.

Now Ryan has a personalized fun place for some evening practice! I incorporated 3 different paper packs, 3 different stamp sets and My Stickease. A well rounded project.


Zippidee Level 2 paper pack
Tinkerin' level 2 paper pack
Good Times Level 2 paper pack
Good Times My Stickease
Rustic Alphabet Stamp Set
Classmate Alphabet Stamp Set
In the Month of August Stamp Set
Basic Button Assortment
Cocoa Ribbon
12x12 Memory Protector
Good Times My Stickease

Sunday, September 26, 2010

A Winter Sketch

I'm finally back to submitting for a challenge this week again. The past several weeks I've been busy and haven't gotten a chance to participate. I guess with work, motherhood, being a wife and school starting life just got ahead of me.

This week was a sketch challenge at Heart 2 Heart. I decided to dig out liquid glass, vellum and lots of glitter. I went with a winter card. It's a 6x6 card I will send to someone special this winter. I hope the glitter will bring lots of smiles.

Here's the sketch I was working from. I decided to push the envelope and use the snowflakes as my circles. I stacked two different snowflake dimensional elements. I sponged them in crystal blue and then added lots of glitter. To soften the blue base I added vellum as the second layer. I added dots over the dots on the blue paper with liquid glass and then added glitter for a shimmery effect.

I'm ready to see what next week's challenge will be!


Monday, September 6, 2010

Christmas Cards

It's that time again when I start working on my annual Christmas Card workshop. This year we'll be using the beautiful creative basic papers with olive and cranberry papers and two different stamp sets.

You get to come and make two of each of the cards (20 total) which includes supplies (precut) for all the cards, envelopes, embellishments and lunch! The embellishements include ribbon and the new Opaques. These are colored, self-adhesive "pearls" that I love. They are super fun and easy to apply and add lots of dimension and pizzaz to your projects. You get an entire package which includes 108 gems total. There are 4 different sizes and three different colors in the package. There will be many left over for you to take home to embellish other projects!

Sign up to make your sets of cards today! Click here to sign up.

November 14, 2010
1-4pm
$20 for the first set and $15 each additional set (if you would like to make additional sets).

Saturday, August 28, 2010

Stitching Things Up

Oh my gosh, I was so excited when I read the challenge at Heart 2 Heart this week...it's all about adding stitching to a project! I have been adding hand stitching lately so I knew this was really going to inspire me to create something fun. I was an avid quilter before I started scrapbooking and haven't used my machine much so I thought this would be the perfect opportunity to dust it off.

I really wanted to make a layout this week so I could add one more to the completed pile. One of my favorite sets of pictures are the self portraits my husband took with he and my son. They were just having fun and being silly.

I was really out of the box for me and I combined three different paper packs, Grace, Moon Doggie and Majestic. Who would have thought those would be good together? I added tons of machine stitching. I first did straight stitching around the base cardstock and then added zigzags in several areas. I even made the "equal sign" by stitching. On the title I put stitches on the letters with the Circle Around stamp set image. So I have some machine and some faux stitching. I love the layout and can't wait to add it to the book...one more done, many more to go!


Desert Sand Cardstock
Bamboo Cardstock
Grace Level 2 Paper Pack
Moon Doggie Level 2 Paper Pack
Majestic Level 2 Paper Pack
Color Me Ready Alphabet
On the Edge Stamp Set
Star Struck Stamp Set
Alphabet Stamp Set
Love Letters Rub Ons
Dimensional Elements
Olive Ink Pad
Cranberry Ink Pad
Honey Ink Pad
Indian Corn Blue Ink Pad

Sunday, August 22, 2010

Get School Inspired

I am so excited to announce that last week I made the Top 5 in the Heart to Heart challenge! I was picked by the design team and am so honored and pleased. I hope you all stop by to check out the work from last week (click here to check it out) which will be used for the 2nd grade page in my sons school album! Ironic that this week is a school challenge at H2H.

This weeks challenge at Heart 2 Heart is to create something that is inspired by going back to school. I know I've waited until the last minute to post but wanted to be sure to make something that really inspired me. With all the talk about going back to school I have been working on my sons School Album. The thing I get stumped with on albums is coming up with a first page. I want it to show what the album is all about. I thought this was the perfect challenge to get me moving on a title page for the album.

I decided a great way to show the purpose of the album was to put together a page that had a small picture of each of his yearly school pictures. It will really display how he continues to grow each year. I went with a classic "School Days" title. In order to get all the pictures in I needed more than the bottom portion of one 12x12 sheet so I decided it would be a perfect place to add in one of the new 4x12 flip flaps. I will put 4 pictures per row and will end up with 3 rows to display 12 pictures. I was still one spot short in order to get K-12 so I left room at the top of the page next to the title where I can put his senior picture.

To really add to the page I decided to use the antique copper embellishments but putting brads on the "S's" in the title, the bigger brad and photo clip on the long ruler and then a series of brads to make a quarter circle in the bottom left corner. Add some stitched stars a bit of twine and several stamped images of common school items and the page is complete. To highlight the pictures I've added in a small tag labeled with the school grade for each photo. I know the page looks empty but as the years go by it will be filled up!

I hope you all like the layout, I know I do! I can't wait to add the 2nd grade picture this fall.


All items used are CTMH (It's a Guy Thing Level 2 paper pack, Honey, Outdoor Denim and Bamboo cardstock, Rustic Alphabet and In the Month of August and Shining Star (template for stitched stars) stamp sets, Antique copper embellishments, twine, large flip flaps, neutral embroidery floss).

Saturday, August 14, 2010

Gettin' Sketchy with H2H


This weeks challenge at Heart to Heart was a sketch challenge. These are some of my most favorite challenges because I love to see what one sketch can inspire in so many people. Although the sketch was published on Monday it's taken me until Saturday afternoon to get it done and posted. I had originally started off planning to make a back to school card to send out but as I started creating I decided it would be become the title for my son's school album. I managed to fit in a ton of embellishments, techniques and papers. The colors are from Jeanette Lynton's Color Me Monday challenge.


Products: Black and Honey Cardstock, Moon Doggie (red strip) which I folded like Roman Shades and sewed down, Back Country paper (plaid behind school bus), Vellum paper, Olive, black and Cranberry inks, embossing powder, dimensional elements (stars from the snowflakes DE), Olive floss for sewing, In the Month of August and Solo 2 stamp sets.

In the end this will be a great title for a school book. Now I can even coordinate his outfit for the first day of school with this!
Check out my website for more artwork and inspiration!